Direct x 11 스터디 6주 차 ( 당시 2020.01.22일 )
객체 이동
개요
이번 스터디 주제는 객체 이동을 구현하는 과제를 수행 하는것이였습니다.
저번까지 사용하던 코드를 베이스로 구현하는것도 좋았지만, 검색 중에 더 좋은 강의 자료와 코드가 있었기 때문에 이를 바탕으로 구현하였습니다.
https://github.com/Pindrought/DirectX-11-Engine-VS2017/tree/Tutorial_43
이 깃허브에서 파일을 받아 맨 위의 참고 유튜브를 바탕으로 만들었습니다.
여기서 쓰인 텍스쳐 로드 라이브러리
[DirectShow][COM] COM 라이브러리 초기화하기
구성
Source.cpp
WinMain호출
->COM초기화하는 CoInitialize호출
->Engine생성 후 engine.Initialize로 RenderWindow Class(render_window)초기화, Graghic Class(gfx) 초기화
->while돌리며 engine.ProcessMessage()가 true값을 반환할때 동안 돌아감
->(engine.ProcessMessage로 호출됨)render_window.ProcessMessages에서는 PeekMessage를 통해 메시지를 디스패치함, 메시지가 WM_NULL일때 false반환
->(source.cpp의 while)engine.Update를 통해 시간 진행과 키보드, 마우스의 입력 확인후 반응
->(source.cpp의 while)engine.RenderFrame에서 Graphic Class의 RenderFrame호출 시 Draw실행
ComPtr
COM객체의 생명주기를 자동으로 컨트롤하는 스마트 포인터
https://hannom.tistory.com/122
RenderWindow.h
RenderWindow Class 정의
윈도우 정보 정의 및 메시지 받아오기
RenderWindow
WindowContainer.h
RenderWindow.h
Keyboard/KeyboardClass.h
Mouse/MouseClass.h
Graphics/Graphics.h
WindowContainer Class 정의
WindowProc를 이용한 입력 처리
ConstantBuffer<T>
Graphic Class에서 VertexShader와 PixelShader에게 넘겨줄 상수버퍼
상수버퍼의 생성을 Template로 관리한다.
상수버퍼의 T data를 수정했다면 ApplyChanges함수를 사용하여 버퍼를 잠그고 데이터를 쓰고 잠금을 해제하는 과정을 한다.
만든 뒤 Device에 올리기까지 함
Vertex
Model Class에서 버텍스 정보를 저장하기 위해 만들어진 구조체
XMFLOAT3인 pos값과 XMFLOAT2인 texCoord가 있다.
VertexBuffer<T>
ID3D11Buffer형식의 buffer을 가지고 있는 클래스
T형태의 버텍스 버퍼 생성을 함
아마 Vertex의 형태가 제각각이기 때문에 템플릿으로 함
만든 뒤 Device에 올리기까지 함
IndexBuffer
VertexBuffer Class와 같이 Vertex의 Index정보를 보내기 위해 만드는 버퍼
아무래도 인덱스 버퍼는 인덱스 값만 넣기 때문에 템플릿이 필요가 없다.
index가 DWORD배열로 배치되어 있는데 이를 보면
typedef unsigned long DWORD
이렇게 새로 정의가 되어있다.
Model 클래스
모델 클래스가 자신의 위치값을 가질수 있도록 바뀌었습니다.
Model 클래스의 worldMatrix
원래 참고로 하던 클래스에서는 worldMatrix를 거의 전역으로 사용하다시피 했는데,
이를 Model 클래스로 넘겨주어 한 모델마다 각각의 World 위치정보를 가질 수 있도록 설정해주었습니다.
이동행렬
4X4행렬인 이동행렬과 현재 위치인 1X4 행 행렬을 사용함
이동행렬을 만드는 법은 항등 행렬 생성 후 마지막 행을 수정해주면 됩니다.
행렬 PM가 이렇게 되어있고
[1 0 0 0]
[0 1 0 0]
[0 0 1 0]
[px py pz 1]
행렬 P가 [x y z 1]형식일때
P*PM이면
[(x*1+y*0+z*0+1*px) (x*0+y*1+z*0+1*py) (x*0+y*0+z*1+1*pz) (x*0+y*0+z*0+1*1)]
즉 [(x+px) (y+py) (z+pz) 1] 형식의 행 행렬이 만들어집니다.
이 행렬은 XMMatrixTranslation함수로 생성할 수 있습니다.
회전 행렬
z축 회전행렬
z축을 기준으로 θ만큼 회전
[cosθ sinθ 0 0]
[-sinθ cosθ 0 0]
[0 0 1 0]
[0 0 0 1]
임의의 점 x,y가 한 원에 있을 때 각도가 θ이고 그에대한 길이를 c라고 해보면
x = c*cosθ
y = c*sinθ
입니다.
그렇다면 각도가 θ인 점 x,y를 θ2만큼 회전시킨 점 x’,y’는
x’=c*cos(θ+θ2)
y’=c*sin(θ+θ2)
삼각함수의 덧셈정리로 인하여
x’=c*cosθ*cosθ2 - c*sinθ*sinθ2
y’=c*sinθ*cosθ2+c*cosθ*sinθ2
이를 x,y로 치환시키면
x’=x*cosθ2-y*sinθ2
y’=y*cosθ2+x*sinθ2
가 됩니다.
결국은 Z축을 기준으로 점 P를 회전한다면 대수형식으로는
x’ = xcosθ2 - ysinθ2
y’ = ysinθ2 + ycosθ2
z’ = z
를 나타냅니다.
이를 행렬의 곱셈으로 치환한다면
[x] [cosθ2 sinθ2 0 0]
[y] * [-sinθ2 cosθ2 0 0]
[z] [0 0 1 0]
[1] [0 0 0 1]
이렇게 유도됩니다.
이와 같은 방식으로
x축 회전행렬
x축을 기준으로 θ만큼 회전
[1 0 0 0]
[0 cosθ sinθ 0]
[0 -sinθ cosθ 0]
[0 0 0 1]
y축 회전행렬
y축을 기준으로 θ만큼 회전
[cosθ 0 -sinθ 0]
[0 1 0 0]
[sinθ 0 cosθ 0]
[0 0 0 1]
XMMatrixRotationRollPitchYaw함수로 x,y,z 회전에 대한 행렬을 만들 수 있습니다.
가장 정석적인 유도방법
구글링 하다 재밌는 유도방법
크기 행렬
[px 0 0 0]
[0 py 0 0]
[0 0 pz 0]
[0 0 0 1]
(px py pz)만큼 크기를 키울때 사용하는 행렬입니다.
이는 항등행렬처럼 비율이 유지되는 성질을 바탕으로 만들어진 행렬입니다.
[x y z 1]
*
[px 0 0 0]
[0 py 0 0]
[0 0 pz 0]
[0 0 0 1 ]
=[x*px y*py z*pz 1]
위 식처럼 각 요소에 값을 곱해주는 역할을 합니다.
연산 순서(SRT)
크기 변환, 회전, 위치 변환을 한꺼번에 하는 World행렬은 이 행렬들이 하나로 합쳐진 행렬입니다.
이 셋을 합쳐서 행렬로 만들 때 순서가 존재하는데
크기(Scale)*회전(Roation)*위치(Position)순서로 하여 SRT라고 합니다.
이유는 크기변환은 간단한 비율연산만 하기때문에 먼저 해줍니다.
위치 변환을 할때 한 점의 기준점에 대해 멀어지거나 가까워지기 때문에 위치를 나중에 해 줍니다.
그렇기 않으면 회전을 할때 회전 비율이 바뀝니다.
그렇게 회전 행렬이 중간에 끼게 됩니다.
Model 클래스 여러개로 렌더
여러모로 궁금했던 사실은 Device에 모델 정보를 보내고 DrawIndex함수를 통해 하나의 모델을 그리고 나서, 또 다른 객체로 같은 과정을 반복하면 어떻게 될지 궁금했다.
이 코드의 Model 클래스의 구성요소들이다.
- 버텍스 / 인덱스 버퍼
- XMFLOAT3로 쉽게 접근 가능한 위치값 및 회전값
- 2번을 바탕으로 만드는 World Matrix
- 텍스쳐를 담는 ShaderResourceView
- DrawIndex를 호출하기 전에 WorldMatrix를 넘겨줄 상수버퍼(ConstantBuffer로 새로하나 만듦)
- 외부에서 받은 Device와 DeviceContext
이 요소들이 하나의 Model 클래스 안에 있는데, 이것들만 있다면 각각 다른 객체라고 부를 수 있는 객체가 만들어질까 궁금했다.
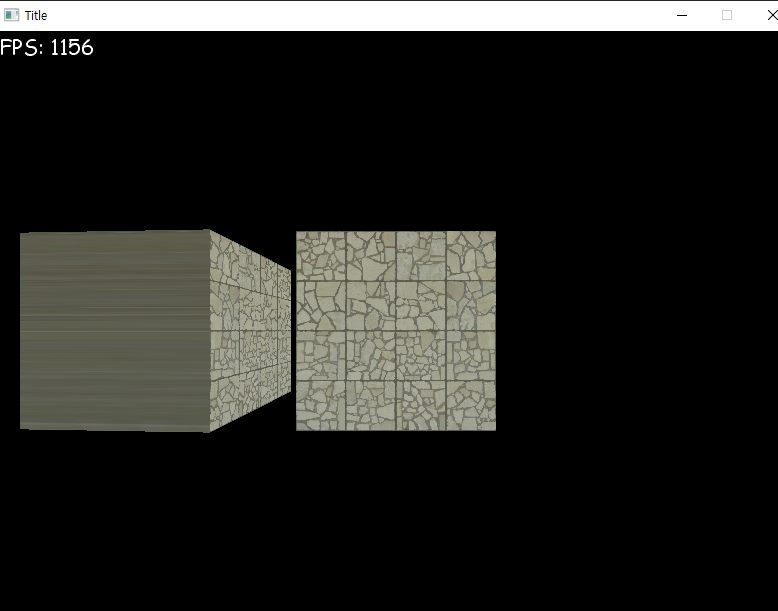
결과는 성공적이였다.
void Model::Draw(const XMMATRIX & viewProjectionMatrix)
{
  //Update Constant buffer with WVP Matrix
  this->cb_vs_vertexshader->data.mat = this->worldMatrix * viewProjectionMatrix; //Calculate World-View-Projection Matrix
  this->cb_vs_vertexshader->data.mat = XMMatrixTranspose(this->cb_vs_vertexshader->data.mat);
  this->cb_vs_vertexshader->ApplyChanges();
  this->deviceContext->VSSetConstantBuffers(0, 1, this->cb_vs_vertexshader->GetAddressOf());

  this->deviceContext->PSSetShaderResources(0, 1, &this->texture); //Set Texture
  this->deviceContext->IASetIndexBuffer(this->indexBuffer.Get(), DXGI_FORMAT::DXGI_FORMAT_R32_UINT, 0);
  UINT offset = 0;
  this->deviceContext->IASetVertexBuffers(0, 1, this->vertexBuffer.GetAddressOf(), this->vertexBuffer.StridePtr(), &offset);
  this->deviceContext->DrawIndexed(this->indexBuffer.BufferSize(), 0, 0); //Draw
}
새로운 Model 클래스의 Draw부분입니다.
전에 했던것과 흐름은 큰 차이가 없지만, Model클래스 객체의 worldMatrix를 XMFLOAT3형태의 pos변수와 rot변수가 갱신될 때 마다 갱신해주었습니다.
여기서 Model 클래스 외부에서 받은 View 행렬과 Projection행렬을 미리 곱한 상태로 넘겨주어 한 세상에서의 위치를 마침내 구합니다.
결과적으로 Model 클래스는 자신만의 위치값을 가지게 되었다는것입니다.
Camera 이동
개요
Camera 클래스는 저번에 구현했던 방식과 구조가 유사합니다.
이번엔 카메라를 이동시키기 까지 해봅시다.
Camera 클래스
Camera 클래스는 View행렬을 만들어주는 클래스입니다.
Camera안에 있는 pos값과 rot값을 이용하여 카메라를 회전해 봅시다.
#pragma once
#include <DirectXMath.h>
using namespace DirectX;

class Camera
{
  public:
    Camera();
    void SetProjectionValues(float fovDegrees, float aspectRatio, float nearZ, float farZ);

    const XMMATRIX & GetViewMatrix() const;
    const XMMATRIX & GetProjectionMatrix() const;

    const XMVECTOR & GetPositionVector() const;
    const XMFLOAT3 & GetPositionFloat3() const;
    const XMVECTOR & GetRotationVector() const;
    const XMFLOAT3 & GetRotationFloat3() const;

    void SetPosition(const XMVECTOR & pos);
    void SetPosition(const XMFLOAT3 & pos);
    void SetPosition(float x, float y, float z);

    void AdjustPosition(const XMVECTOR & pos);
    void AdjustPosition(const XMFLOAT3 & pos);
    void AdjustPosition(float x, float y, float z);

    void AdlookPosition(float speed);

    void SetRotation(const XMVECTOR & rot);
    void SetRotation(const XMFLOAT3 & rot);
    void SetRotation(float x, float y, float z);

    void AdjustRotation(const XMVECTOR & rot);
    void AdjustRotation(const XMFLOAT3 & rot);
    void AdjustRotation(float x, float y, float z);

    void SetLookAtPos(XMFLOAT3 lookAtPos);
    const XMVECTOR & GetForwardVector();
    const XMVECTOR & GetRightVector();
    const XMVECTOR & GetBackwardVector();
    const XMVECTOR & GetLeftVector();
  private:
    void UpdateViewMatrix();
    XMVECTOR posVector;
    XMVECTOR rotVector;
    XMFLOAT3 pos;
    XMFLOAT3 rot;
    XMMATRIX viewMatrix;
    XMMATRIX projectionMatrix;

    const XMVECTOR DEFAULT_FORWARD_VECTOR = XMVectorSet(0.0f, 0.0f, 1.0f, 0.0f);
    const XMVECTOR DEFAULT_UP_VECTOR = XMVectorSet(0.0f, 1.0f, 0.0f, 0.0f);
    const XMVECTOR DEFAULT_BACKWARD_VECTOR = XMVectorSet(0.0f, 0.0f, -1.0f, 0.0f);
    const XMVECTOR DEFAULT_LEFT_VECTOR = XMVectorSet(-1.0f, 0.0f, 0.0f, 0.0f);
    const XMVECTOR DEFAULT_RIGHT_VECTOR = XMVectorSet(1.0f, 0.0f, 0.0f, 0.0f);

    XMVECTOR vec_forward;
    XMVECTOR vec_left;
    XMVECTOR vec_right;
    XMVECTOR vec_backward;

    XMVECTOR vec_target;
};
Camera클래스의 헤더파일입니다.
간단하게 요약하면
카메라는 x,y,z속성의 position값과 rotation값을 가지고 있는데 이를 기준으로 ViewMatrix와 카메라의 상, 하, 좌, 우를 결정합니다.
position과 rotation을 수정하는 방법은 다양한 함수로 수정이 됩니다.
XMVECTOR가 있는 이유는 전에 글에서도 적었듯이 SIMD방식 계산을 이용하기 위함입니다.
void Camera::UpdateViewMatrix() //Updates view matrix and also updates the movement vectors
{
  //Calculate camera rotation matrix
  XMMATRIX camRotationMatrix = XMMatrixRotationRollPitchYaw(this->rot.x, this->rot.y, this->rot.z);
  //Calculate unit vector of cam target based off camera forward value transformed by cam rotation matrix
  XMVECTOR camTarget = XMVector3TransformCoord(this->DEFAULT_FORWARD_VECTOR, camRotationMatrix);

  vec_target = camTarget;
  //Adjust cam target to be offset by the camera's current position
  camTarget += this->posVector;
  //Calculate up direction based on current rotation
  XMVECTOR upDir = XMVector3TransformCoord(this->DEFAULT_UP_VECTOR, camRotationMatrix);
  //Rebuild view matrix
  this->viewMatrix = XMMatrixLookAtLH(this->posVector, camTarget, upDir);

  XMMATRIX vecRotationMatrix = XMMatrixRotationRollPitchYaw(0.0f, this->rot.y, 0.0f);
  this->vec_forward = XMVector3TransformCoord(this->DEFAULT_FORWARD_VECTOR, vecRotationMatrix);
  this->vec_backward = XMVector3TransformCoord(this->DEFAULT_BACKWARD_VECTOR, vecRotationMatrix);
  this->vec_left = XMVector3TransformCoord(this->DEFAULT_LEFT_VECTOR, vecRotationMatrix);
  this->vec_right = XMVector3TransformCoord(this->DEFAULT_RIGHT_VECTOR, vecRotationMatrix);
}
Camera 클래스에서 rot변수와 pos변수가 수정될 때 마다 호출이 되는 함수입니다.
이는 뷰 행렬을 새로 갱신합니다.
키보드와 마우스 입력 시스템
개요
WinApi에서는 WindowProc함수로 Dispatch한 메시지를 받습니다.
이런 입력된 메시지의 종류를 구별하여 그에 맞는 처리를 진행합니다.
이 코드에서 구현된 키보드 및 마우스 입력 처리를 분석해 보겠습니다.
보기 전에 WindowProc가 받는 매개변수들에 대한 설명과 관련된 매크로를 확인하시면 더욱 좋습니다
키보드 입력
가장 중요한 입력 중 하나인 키보드 입력에 대해서 봅시다.
switch (uMsg)
{
  //Keyboard Messages
  case WM_KEYDOWN:
  {
    unsigned char keycode = static_cast<unsigned char>(wParam);
    if (keyboard.IsKeysAutoRepeat())
    {
    	keyboard.OnKeyPressed(keycode);
    }
    else
    {
    	const bool wasPressed = lParam & 0x40000000;
    if (!wasPressed)
    {
	    keyboard.OnKeyPressed(keycode);
    }
    }
	    return 0;
  }
  case WM_KEYUP:
  {
    unsigned char keycode = static_cast<unsigned char>(wParam);
    keyboard.OnKeyReleased(keycode);
    return 0;
  }
  case WM_CHAR:
  {
    unsigned char ch = static_cast<unsigned char>(wParam);
    if (keyboard.IsCharsAutoRepeat())
    {
    	keyboard.OnChar(ch);
    }
    else
    {
      const bool wasPressed = lParam & 0x40000000;
      if (!wasPressed)
      {
      	keyboard.OnChar(ch);
      }
   }
  	return 0;
}
Dispatch된 메시지의 정보들을 Case문으로 구별해내는데, WM_KEYDONW 및 WM_KEYUP은 문자가 아닌 키보드의 메시지를 받습니다.
WM_CHAR은 메시지 종류가 문자일때를 표시합니다
http://soen.kr/lecture/win32api/lec4/lec4-1-1.htm / WM_CHAR
http://soen.kr/lecture/win32api/lec4/lec4-1-3.htm / WM_KEY
“과연 WM_KEYDOWN과 WM_CHAR은 서로 겹치지 않을까?” 라는 궁금증이 생겨 직접 디버깅을 해보았다.
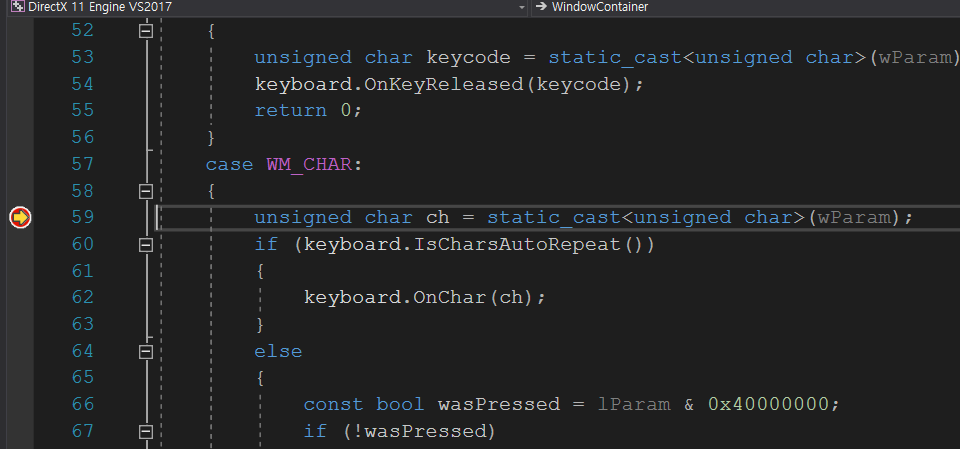
상하좌우키를 눌러보았지만 멈추지 않았고 아무런 문자키를 누르자 WM_CHAR부분에 걸렸다.
KeyboardClass
case문 안에 키보드 입력관련 이벤트가 걸렸을 때 keyboard변수에 메시지를 넣는 모습이 보일것입니다.
이제 이런 메시지들을 저장하는 KeyboardClass를 활용하는 부분입니다.
#pragma once
#include "KeyboardEvent.h"
#include <queue>

class KeyboardClass
{
  public:
    KeyboardClass();
    bool KeyIsPressed(const unsigned char keycode);
    bool KeyBufferIsEmpty();
    bool CharBufferIsEmpty();
    KeyboardEvent ReadKey();
    unsigned char ReadChar();
    void OnKeyPressed(const unsigned char key);
    void OnKeyReleased(const unsigned char key);
    void OnChar(const unsigned char key);
    void EnableAutoRepeatKeys();
    void DisableAutoRepeatKeys();
    void EnableAutoRepeatChars();
    void DisableAutoRepeatChars();
    bool IsKeysAutoRepeat();
    bool IsCharsAutoRepeat();
  private:
    bool autoRepeatKeys = false;
    bool autoRepeatChars = false;
    bool keyStates[256];
    std::queue<KeyboardEvent> keyBuffer;
    std::queue<unsigned char> charBuffer;
};
KeyboardClass의 헤더파일입니다.
헤더파일을 보면 메시지를 Queue를 이용하여 저장하는 방식임을 짐작할 수 있습니다.
그런데 KeyboardEvent와 ungined char형식으로 일반 키와 문자 키를 나누어서 저장하는 모습을 볼 수 있습니다.
#pragma once

class KeyboardEvent
{
  public:
    enum EventType
    {
      Press,
      Release,
      Invalid
    };

    KeyboardEvent();
    KeyboardEvent(const EventType type, const unsigned char key);
    bool IsPress() const;
    bool IsRelease() const;
    bool IsValid() const;
    unsigned char GetKeyCode() const;

  private:
    EventType type;
    unsigned char key;
};
KEY입력의 정보를 저장하는 KeybardEvent클래스의 헤더파일입니다.
키가 입력된 종류를 저장하고, 이 키가 눌린 신호인지, 놓은 신호인지를 파악합니다.
기본적으로 Invalid값 즉 무효값을 가지고 있습니다.
void KeyboardClass::OnKeyPressed(const unsigned char key)
{
  this->keyStates[key] = true;
  this->keyBuffer.push(KeyboardEvent(KeyboardEvent::EventType::Press, key));
}

void KeyboardClass::OnKeyReleased(const unsigned char key)
{
  this->keyStates[key] = false;
  this->keyBuffer.push(KeyboardEvent(KeyboardEvent::EventType::Release, key));
}

void KeyboardClass::OnChar(const unsigned char key)
{
	this->charBuffer.push(key);
}
KeyboardClass의 키 입력받는 함수입니다.
이는 WindowContainer의 WindowProc함수에서 메시지 종류를 체크한뒤 종류별로 호출합니다.
WM_KEYDOWN일시 OnKeyPressed함수를 호출하여 키가 입력된 상황과, KeyboardEvent를 생성하여 Queue에 넘겨줍니다.
WM_KEYUP일때에도 키가 입력되어 있지 않다고 false처리를 해준 뒤 Event를 넘깁니다.
WM_CHAR일때는 받아온 문자 정보를 unsigned char형식 Queue로 저장합니다.
if (keyboard.KeyIsPressed('W'))
{
	this->gfx.camera.AdlookPosition(cameraSpeed*dt);
}
프레임마다 돌아가는 Engine 클래스의 Update함수 구문입니다.
만약 keyboard의 ‘W’부분이 눌려져 있으면 카메라를 움직여줍니다.
bool KeyboardClass::KeyIsPressed(const unsigned char keycode)
{
	return this->keyStates[keycode];
}
KeyboardClass안에 있는 256크기를 가진 bool배열로 체크를 하기때문에 ‘W’이라는 값을 대문자로 보내주어야 정확하게 판단 할 수 있습니다.
if (keyboard.KeyIsPressed(VK_SPACE))
{
	this->gfx.camera.AdjustPosition(0.0f, cameraSpeed * dt, 0.0f);
}
문자가 아닌 특정 키의 매크로를 보내주어도 문자가 아닌 키도 판별할 수 있습니다.
MouseClass
마우스 입력을 받는 방식도 유사합니다.
case WM_MOUSEMOVE:
{
  int x = LOWORD(lParam);
  int y = HIWORD(lParam);
  mouse.OnMouseMove(x, y);
  return 0;
}
case WM_LBUTTONDOWN:
{
  int x = LOWORD(lParam);
  int y = HIWORD(lParam);
  mouse.OnLeftPressed(x, y);
  return 0;
}
case WM_RBUTTONDOWN:
{
  int x = LOWORD(lParam);
  int y = HIWORD(lParam);
  mouse.OnRightPressed(x, y);
  return 0;
}
case WM_MBUTTONDOWN:
{
  int x = LOWORD(lParam);
  int y = HIWORD(lParam);
  mouse.OnMiddlePressed(x, y);
  return 0;
}
case WM_LBUTTONUP:
{
  int x = LOWORD(lParam);
  int y = HIWORD(lParam);
  mouse.OnLeftReleased(x, y);
  return 0;
}
case WM_RBUTTONUP:
{
  int x = LOWORD(lParam);
  int y = HIWORD(lParam);
  mouse.OnRightReleased(x, y);
  return 0;
}
case WM_MBUTTONUP:
{
  int x = LOWORD(lParam);
  int y = HIWORD(lParam);
  mouse.OnMiddleReleased(x, y);
  return 0;
}
case WM_MOUSEWHEEL:
{
  int x = LOWORD(lParam);
  int y = HIWORD(lParam);
  if (GET_WHEEL_DELTA_WPARAM(wParam) > 0)
  {
  	mouse.OnWheelUp(x, y);
  }
  else if (GET_WHEEL_DELTA_WPARAM(wParam) < 0)
  {
  	mouse.OnWheelDown(x, y);
  }
  return 0;
}
wParam으로 메시지 정보를 받고 lParam의 값을 매크로로 나누어 좌표값을 가져옵니다.
왼쪽 버튼 휠 버튼 오른쪽 버튼마다 눌림, 떼어짐이 있으며, 휠을 움직이는것과 마우스를 움직이는 메시지도 보내줍니다.
#pragma once
#include "MouseEvent.h"
#include <queue>

class MouseClass
{
  public:
    void OnLeftPressed(int x, int y);
    void OnLeftReleased(int x, int y);
    void OnRightPressed(int x, int y);
    void OnRightReleased(int x, int y);
    void OnMiddlePressed(int x, int y);
    void OnMiddleReleased(int x, int y);
    void OnWheelUp(int x, int y);
    void OnWheelDown(int x, int y);
    void OnMouseMove(int x, int y);
    void OnMouseMoveRaw(int x, int y);

    bool IsLeftDown();
    bool IsMiddleDown();
    bool IsRightDown();

    int GetPosX();
    int GetPosY();
    MousePoint GetPos();

    bool EventBufferIsEmpty();
    MouseEvent ReadEvent();

  private:
    std::queue<MouseEvent> eventBuffer;
    bool leftIsDown = false;
    bool rightIsDown = false;
    bool mbuttonDown = false;
    int x = 0;
    int y = 0;
};
MouseClass의 헤더파일입니다.
마우스도 키보드와 같이 MouseEvent형태의 Queue로 이벤트를 저장하고, 3개의 버튼의 입력 유무와 마우스 커서의 위치를 표시합니다.
#pragma once
struct MousePoint
{
  int x;
  int y;
};

class MouseEvent
{
  public:
    enum EventType
    {
      LPress,
      LRelease,
      RPress,
      RRelease,
      MPress,
      MRelease,
      WheelUp,
      WheelDown,
      Move,
      RAW_MOVE,
      Invalid
    };
  private:
    EventType type;
    int x;
    int y;
    public:
    MouseEvent();
    MouseEvent(const EventType type, const int x, const int y);
    bool IsValid() const;
    EventType GetType() const;
    MousePoint GetPos() const;
    int GetPosX() const;
    int GetPosY() const;
};
MouseEvent클래스입니다.
이벤트의 종류와, 이벤트가 실행될 때의 마우스 커서 위치를 저장합니다.
while (!mouse.EventBufferIsEmpty())
{
  MouseEvent me = mouse.ReadEvent();
  if (mouse.IsRightDown())
  {
    if (me.GetType() == MouseEvent::EventType::RAW_MOVE)
    {
    	this->gfx.camera.AdjustRotation((float)me.GetPosY() * 0.01f, (float)me.GetPosX() * 0.01f, 0);
    }
  }
}
매 프레임마다 돌아가는 Engine 클래스의 마우스 입력구문입니다.
mouse에 입력되어있는 MouseEvent Queue가 빌때까지 마우스 이벤트를 받은 뒤 팝을 합니다.
입력을 받을때 마다 ‘특수한 버튼이 눌렸는가’ / ‘ 특정 이벤트가 실행된 위치’를 받습니다.
그런 다음 카메라를 MouseEvent의 값 만큼 돌려줍니다.
그런데 enum 값으로 MOVE말고 RAW_MOVE를 받습니다.
이는 마우스가 이동한 위치가 아닌, 상대적으로 이동한 값을 받습니다.
받는 부분은 소개하지 않았던 WindowProc의 WM_INPUT부분입니다.
case WM_INPUT:
{
	UINT dataSize;
  GetRawInputData(reinterpret_cast<HRAWINPUT>(lParam), RID_INPUT, NULL, &dataSize, sizeof(RAWINPUTHEADER)); //Need to populate data size first

  if (dataSize > 0)
  {
    std::unique_ptr<BYTE[]> rawdata = std::make_unique<BYTE[]>(dataSize);
    if (GetRawInputData(reinterpret_cast<HRAWINPUT>(lParam), RID_INPUT, rawdata.get(), &dataSize, sizeof(RAWINPUTHEADER)) == dataSize)
    {
      RAWINPUT* raw = reinterpret_cast<RAWINPUT*>(rawdata.get());
      if (raw->header.dwType == RIM_TYPEMOUSE)
      {
          mouse.OnMouseMoveRaw(raw->data.mouse.lLastX, raw->data.mouse.lLastY);
      }
    }
  }

  return DefWindowProc(hwnd, uMsg, wParam, lParam); //Need to call DefWindowProc for WM_INPUT messages
}
이에관한 부분은 나중에 자세히 다루도록 하겠습니다.
일단은 이동한 마우스의 값을 받는다는 정보만 알고 가도록 하겠습니다.
결과
일반적으로 앞/뒤로만 움직였던 카메라를 카메라가 보고 있는 방향으로 움직이도록 수정했습니다.
모델 클래스 타입의 변수를 하나 생성하여 2개를 연속으로 렌더링 할 수 있도록 해보았습니다.
키 입력에 따라 모델이 움직일 수 있도록 했습니다.
추가 결과
더 발전하여, 블럭을 자유롭게 생성 가능하도록 변경하였습니다.
'DirectX' 카테고리의 다른 글
| [Directx 11] 스터디 5일차 조명 (0) | 2020.02.01 |
|---|---|
| [DirectX 11] 스터디 4일 텍스쳐 (0) | 2020.02.01 |
| [DirectX 11] 스터디 3일 버퍼/셰이더 (2) | 2020.01.19 |
| [Direct x 11] 스터디 2일 Directx 3D초기화 (0) | 2020.01.19 |
| [DirectX 11] 스터디 1일 프레임 워크 짜기 (1) | 2019.12.18 |


댓글